Thursday, 29 June 2017

Wide Angle Close Up

Wide Angle Close Up Photography

Wide angle lens is the opposite to a telephoto lens. 

It provide a broader field of view than the human eye.

It can be used to take a picture of a wide subject in a tight spot.

A wide-angle lens deepens space; it makes everything seem further away from the camera.

It also depends or increases the depth of field.


Wide Angle Close Up Experiments


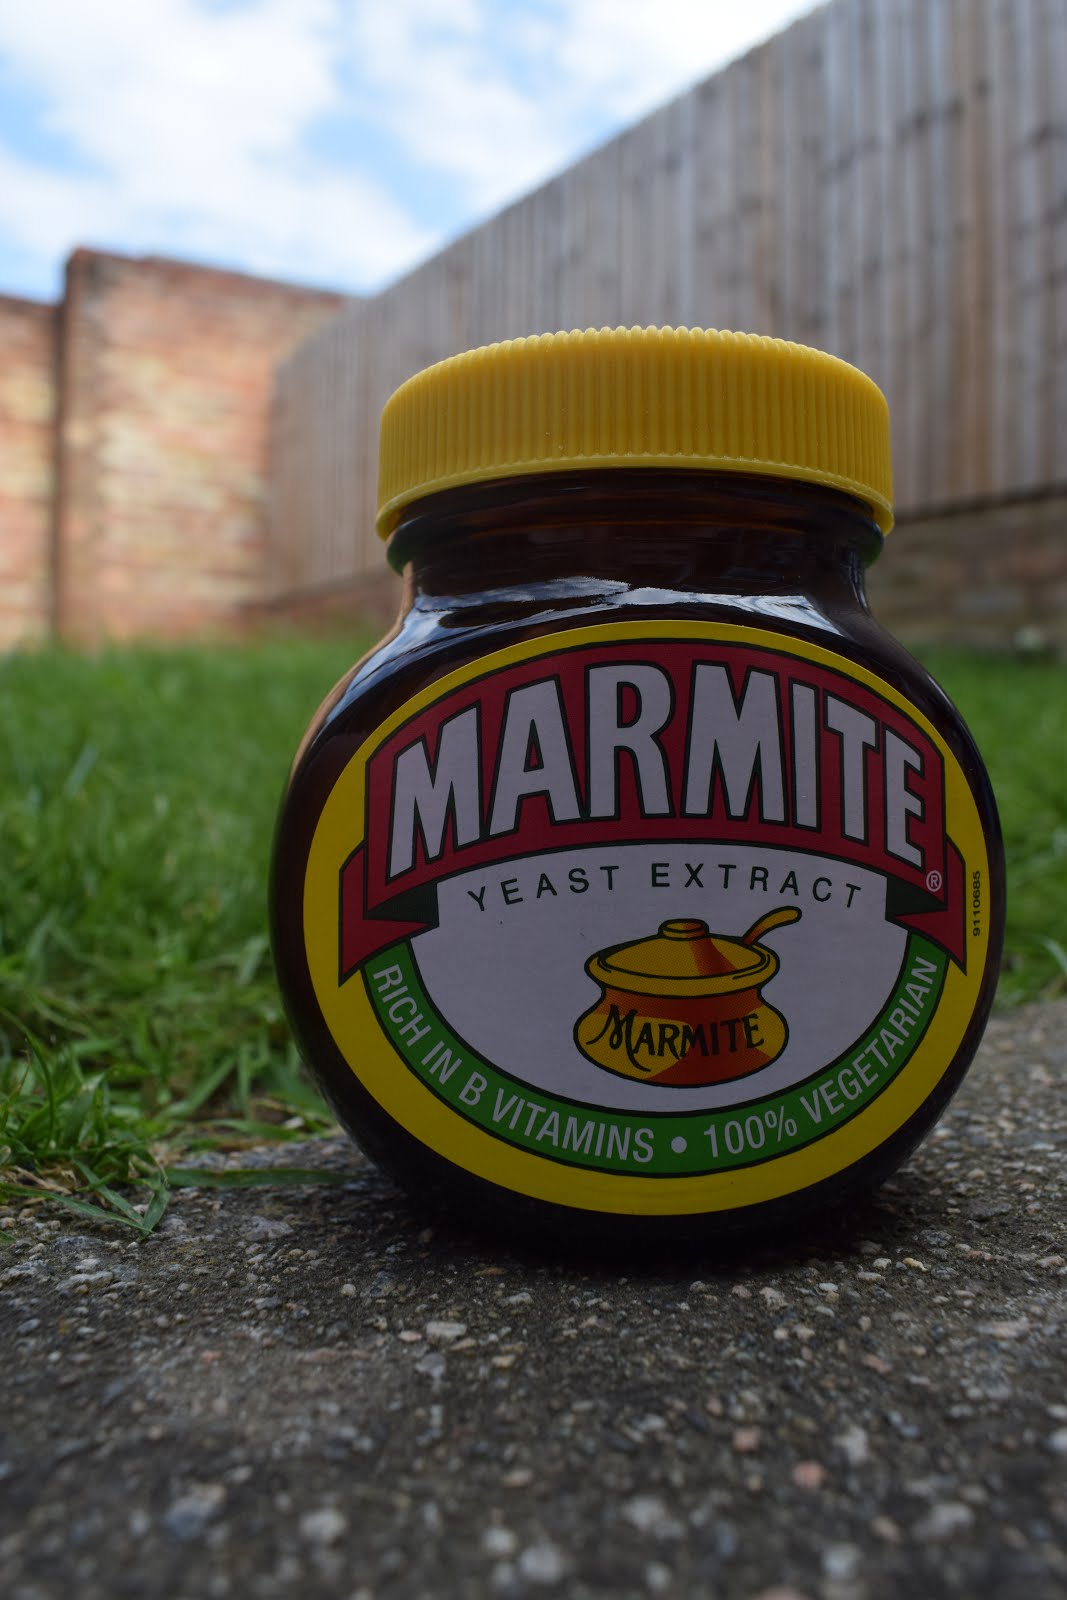
To show wide angle close up photography I photographed a tub of marmite to show how I could make it look larger than it actually is. I think this worked particularly well in the first image because I positioned it on a wall so that when you look at it, it appears next to the car making it look larger than the car. To take this image I positioned the camera close to the object which made the main focus of the image position on the object and made everything else in the background. This is also what happened in the second picture everything in the background. The marmite is more so the main focus of the image in the second picture as it is slightly more in the middle than the first image. I think the first image works better than the second image because of the background that it is in. To improve this technique I could use different objects and locations to show this technique even more. 


These two images are similar to the images before but I chose a different object to experiment with. I don't think this object worked as well because the reflection off the packaging is quite distracting. The first image works better then the second image because the background has been completely blurred unlike the second image where the background isn't blurred to the extent that it should be. I found this technique quite hard because the camera had to be positioned quite low to grasp this technique that a tripod couldn't be used, it had to be done without one. Although a tripod is said to produce a better picture I think the ones that I have produced still work but I should've took more time when choosing the objects and the locations. As I said before, to improve and further this technique I will focus on choosing different objects and different locations. 

Focal Length

Focal Length
  • A camera lens may be designated as prime or zoom.
  • A prime lens has a fixed focal length that does not change.
  • A zoom lens is one that allows the user to alter the focal length.
  • Prime lenses are generally higher quality while zoom lenses offer more flexibility.
  • The focal length of a lens is defined as the distance in mm from the optical centre of the lens to the focal point, which is located on the sensor. 
  • The field of view (FOV) is determined by the angle of view from the lens out to the scene and can be measured horizontally or vertically.
  • Larger sensors or films have wider FOVs and can capture more of the scene.
  • In 35mm photography, lenses with a focal length of 50mm are called 'normal' because they work without reducing or magnifying and creates images the way we see the scene with our naked eyes (same picture angle 46 degrees).
  • Wide angle lenses (short focal length) capture more because they have a wider picture angle.
  • Telephoto lenses (long focal length) have a narrower picture angle.
  • A longer focal length is associated with larger magnification of distant objects, and a narrower angle of view.
  • A shorter focal length is associated with a reduction of objects and a wider angle of view. 

  • <20mm = Super wide angle

  • 24 - 35mm = Wide angle

  • 50mm = Normal lens

  • 80mm - 300mm = Tele

  • >300mm = Super tele
Wide Angle
  • Wide FOV 
  • Some Distortion 

Normal (50mm)
  • FOV equivalent to the human eye
  • Used for variety of purposes.

Telephoto
  • Narrow FOV
  • Low distortion
  • Relatively shallower depth of field


Focal Length Experiments


In this sequence of images we can see the head and shoulders of this girl present in each image. To capture each of these images I used an increasing focal length, I started at 18mm and ended at 55mm. When increasing the focal length I had to reposition myself to position her head and shoulders in the shot. As I was constantly moving I decided not to use a tripod because it would've taken time to keep readjusting the height and position of the tripod. As we can see from the series of images that I have produced the first few that I took appeared distorted slightly because I was quite close to her face which prevented the lens from capturing a wider angle view. As the focal length increases the distortion decreases significantly, the las picture shows a normal shot of the girl with the highest focal length showing a very wide angle. Everything has stayed in shot throughout this sequence but the normality of it only comes clear in the last few shots. This focal length experiment was carried out to show how the lower the focal length the more distorted and the lower the wider angle of the image. This experiment has worked significantly well because when we compare the last and the first image the difference in distortion is high. 


This sequence of images was conducted to show how the different focal lengths change the images. Unlike the first experiment I have conducted this one isn't as clear because the images are not technically good images. When increasing the focal length in this experiment we can see how much closer we get to the girl and how much background is cut off. As the sequence of images progress the closer we get to the girls, also the progression of these photos also increases the amount of detail we can see in each image, for example the details of the plants become bolder as the focal length increases. The only downfall with this experiment is as we increase the focal length her head gets slightly cut off which could've been improved if I had position the camera in a different way. Unlike the first experiment I conducted I used a tripod in this experiment because I needed the camera to be steady to show how changing the focal length of a stationary camera decreases the extent of background we can see. 


Thursday, 22 June 2017

Macro

Macro

This is expressed as a reproduction ratio of 1x or 1:1.  

This life-size "reproduction ratio" should not be confused with lens magnification.

Macro lenses come in a variety of focal lengths.  

A close-up attachment will allow closer focusing distances, but at some degradation (loss) in image quality.


Macro Experiments


To capture these images I used studio lighting and a studio camera with a macro lens. The macro lens is used to get close up focussed images. I used eyes when photographing with the macro lens, I think photographing eyes is good when it comes to using the macro lens because it shows the eye in great detail which cannot be captured on a normal lens. These images turned out well because both of the eyes are in focus and we can see a lot of detail in them. If I was going to improve these images more I could've captured other peoples eyes because these two are quite similar in the sense of their skin colour and eye colour, I could use a wider range of people to photograph their eyes.


To capture these images of the leaves I used the same equipment as I did in the images of the eyes. The macro lens worked well with these leaves because the veins are very visible and the sharpness that has been captured cannot be captured with a normal lens. The only thing I could improve on these images is the placement of the leaf, I could've placed the leaf or got someone to hold the leaf in a different way so that there was more or less visible with more detail. I could've also photographed different plants and flowers which would further the experiment of this technique as more colours would've been used.

In my final work I could experiment with the macro technique but because it is more studio based I am not expecting to produce a lot of images with that technique. I am planning on shooting outside rather than in a studio but I could experiment with the macro lens slightly. 

Sequencing Technique

Sequencing Technique


By definition, a sequence is a serial arrangement in which things follow in logical order or a recurrent pattern. Photo sequencing is actually stitching multiple images together and it is a form of time-lapse photography. A change in an object’s position over time is being displayed and it only works when the object moves across a static background.

This photo uses sequencing techniques well because it shows the steps that this boy on the bike takes, there is no overlapping in the picture which also makes it work well.


How can I achieve a photo-sequene:
1.Tripod
2.Fast shutter speed
3.Manual camera settings (to fix the exposure)
4.Manual focus
5.No Camera shake (be careful when pressing the button).
6.Direct the shoot (composition/framing and where the moving elements will move from and to are important.


7.Photo-editing software

Sequencing Technique Image Bank
Here are some images I took from google to show the sequencing technique. Each of these images inspire me to take this technique further and maybe use it in my final work. I like the ideas behind each of these images which may influence the work I progress on to do.


Sequencing Technique Experiments


This was my first attempt at using sequencing technique, I think this was a good attempt and it was my favourite out of the two that I created. To create this image I took three pictures of the girl on the swing and put them into photoshop. In photoshop I added all the images onto one document using layers, then created a mask for each layer and used the paintbrush to expose all of the images. This merged them all together making them into one image. I took more than the images that are visible here but I had to choose three images that didn't overlap each other, if the images overlapped it would make it harder to put into photoshop and they would not turn out as well as expected. The idea that I had behind this image was a good one because it almost tells a story showing where the girl goes when she is on the swing. I prefer this sequencing image out of the two that I have created because this one looks less edited, it almost acts as if we are looking at three different people on a swing, it looks more realistic.


This was my second attempt at using sequencing technique, I think this was a good attempt but it isn't my favourite out of the two that I created because this one looks more edited than the one before. I think the sunlight affected the way that the images were taken because the brightness and darkness of the images were different. It was harder to merge the two images together because of this. This image didn't turn out the way I wanted but it is good to use it as an experiment. Also, this was located on a hill which most likely effected the way that the image was taken. To improve this image next time I will make sure that all the images are the same brightness and can all merge together correctly.  

If I was going to use the sequencing technique in my final work I would use it to track the path of a specific vehicle as I want to look at transport in different locations. I am considering using this technique in my final work because it is another technique that I can incorporate into my work. 

Wednesday, 21 June 2017

Animated GIF

Animated Gif Technique

An animated GIF is an image encoded in graphics interchange format (GIF),which contains a number of images or frames in a single file and is described by its own graphic control extension. The frames are presented in a specific order in order to convey animation. An animated GIF can loop endlessly or stop after a few sequences.


T        This gif was created by Eadward Muybridge. He photographed horses to see if all four of their legs came off the ground, the images he took were then made into a gif shown here. 

Animated Gif Image Bank

Here are some gifs I took from tumblr. These gifs express the ways that I may want to take this technique further. I like the ideas behind each these gifs, they have all inspired me to want to take this technique further and experiment with it in my final work. 


Animated Gif Experiments


This was my first attempt at making a gif. I think it turned out well but I would've like it to turn out a bit better than this. As you can see in the series of the images that are present in the gif there are a few that are not totally in focus which is not good. If these images were in focus I think it would've turned out better than it did. I think the reason that these images didn't turn out as well as expected was because during the steps in making the gif the size of the image had to be changed which I think affected the focus of one of the images. The idea behind this gif was good because it shows her turning round on the roundabout in a full circle. In the gif I only used 4 images, to improve this image I could've used more to make the gap between where she is standing less. Also, next time I will make sure all the images can be seen easily whilst creating the gif making it easier for all the images to stand out. 


This was my second attempt at making a gif. I think it turned out well, better than the first gif that I created. All the images are in focus and they all fit together to make the transform to the next image clear and smooth. In this image I used five images, all of the images that I took during this capture. I would've liked to have incorporated more but I think five was enough images to use. The only other thing that I would change about this gif is the location it is in, I could've used a better location to make the gif look more attractive. However, I like that you can see the shadow that she is creating on the grass in front of her whenever she moves. To improve this image I would change the location of the gif, however I think that this was the best gif that I created because all the images are in focus and the gif runs smoothly.

If I was going to continue with this technique in my final work I would incorporate more images into the gif because it would look better and include more of a story. I am going to experiment in my final work by using gifs because I like them and they interest me. I enjoy working with photoshop so this is great experience in furthering my photoshop skills.

Central London Tower Hill and St. Paul's: Shoot 10 Work Diary

Central London Tower Hill and St. Paul's: Shoot 10 Work Diary Shoot Ideas I wasn't originally going to produce a shoot 10 but aft...